
Imagine biting into a golden, flaky crescent roll, only to discover a warm, tender chicken filling bursting with flavor—a perfect harmony of crispy dough and juicy meat. Sounds like a dream, right? Well, it’s not just a fantasy; it’s a reality you can create in your kitchen with our ultimate guide to chicken stuffed crescent rolls. Whether you’re a busy parent looking for a quick dinner fix or a home cook eager to impress, this dish is your ticket to culinary bliss.
In this comprehensive guide, we’ll walk you through every step, from selecting the perfect ingredients to mastering the art of a crispy crust. We’ll cover the history of this beloved dish, share expert tips, and even throw in some creative twists to keep things exciting. Ready to roll? Let’s get started!
Table of Contents
Understanding Chicken Stuffed Crescent Rolls
What Are Chicken Stuffed Crescent Rolls?
At their core, chicken stuffed crescent rolls are a savory delight—a flaky, buttery crescent roll dough wrapped around a flavorful filling of tender chicken, often mixed with cheese, vegetables, or spices. Think of them as a portable, golden pocket of comfort, perfect for dinners, lunches, or even party appetizers. But where did this ingenious idea come from?
A Brief History
The crescent roll itself has roots tracing back to the Austrian kipferl, a crescent-shaped pastry popularized in Vienna in the 13th century. Fast forward to the 19th century, and French bakers refined it into the modern croissant. But the convenience of crescent rolls as we know them today? That’s thanks to Pillsbury, which introduced refrigerated crescent roll dough in the 1960s, revolutionizing home cooking. The idea of stuffing them with chicken likely emerged as a creative way to use leftovers, blending convenience with comfort.
Why They’re So Popular
Why do chicken stuffed crescent rolls remain a family favorite? It’s simple:
- Convenience: Ready in under 30 minutes, especially with store-bought dough.
- Versatility: Fill them with anything from BBQ chicken to taco-seasoned meat.
- Appeal: Kids and adults alike love the flaky, golden exterior and juicy filling.
“The beauty of crescent rolls lies in their simplicity—transforming humble ingredients into something extraordinary.”
Chef Maria, Culinary Expert, 2025
Selecting the Right Ingredients
The secret to crispy and tender chicken stuffed crescent rolls starts with choosing the best ingredients. Let’s break it down:
Crescent Roll Dough: Store-Bought vs. Homemade
Your dough is the foundation of this dish, so choose wisely:
- Store-Bought Original: Convenient, affordable, and consistent, ideal for beginners. Pillsbury’s original crescent rolls are a go-to, offering a flaky texture without overwhelming richness.
- Store-Bought Butter: Richer in flavor, these yield an even flakier, more indulgent roll. Perfect for special occasions.
- Homemade: For the adventurous, homemade dough allows total control over ingredients—no preservatives, customizable flavors—but it’s time-intensive.
Table: Comparison of Crescent Roll Dough Types
| Dough Type | Pros | Cons |
|---|---|---|
| Store-Bought Original | Convenient, consistent, affordable | Less flavor, may contain preservatives |
| Store-Bought Butter | Richer flavor, flaky texture | Slightly more expensive |
| Homemade | Customizable, no additives | Time-consuming, requires skill |
For most, store-bought butter dough strikes the perfect balance. Want to explore homemade? Check out Pillsbury’s guide for inspiration.
Chicken: The Heart of the Filling
To achieve tender chicken, consider:
- Best Cuts: Chicken breast is lean and widely used, but thighs offer more moisture and flavor. For convenience, rotisserie chicken works wonders.
- Cooking Methods: Bake at 350°F for 20-25 minutes, boil, or pan-fry until the internal temperature reaches 165°F. Avoid overcooking to prevent dryness.
Other Ingredients: Elevating Flavor
- Cheese: Mozzarella melts beautifully, while cheddar adds a sharp kick. Mix both for a balanced filling.
- Vegetables: Onions, bell peppers, or spinach add color and nutrition. Sauté them first to reduce moisture.
- Spices: Garlic powder, salt, pepper, and paprika are staples. For a twist, try Italian seasoning or taco spices.
Preparing the Filling
Now that you’ve got your ingredients, let’s make that filling irresistible. Here’s how to ensure tender chicken and a cohesive filling:
Step 1: Cook the Chicken
For tender chicken, cook it just until done. My go-to method? Bake chicken breasts at 350°F for 20-25 minutes, seasoned with salt, pepper, and a drizzle of olive oil. Once cooled, shred it with two forks or a hand mixer for even strands. Pro tip: Save time by using leftover rotisserie chicken—talk about a weeknight win!
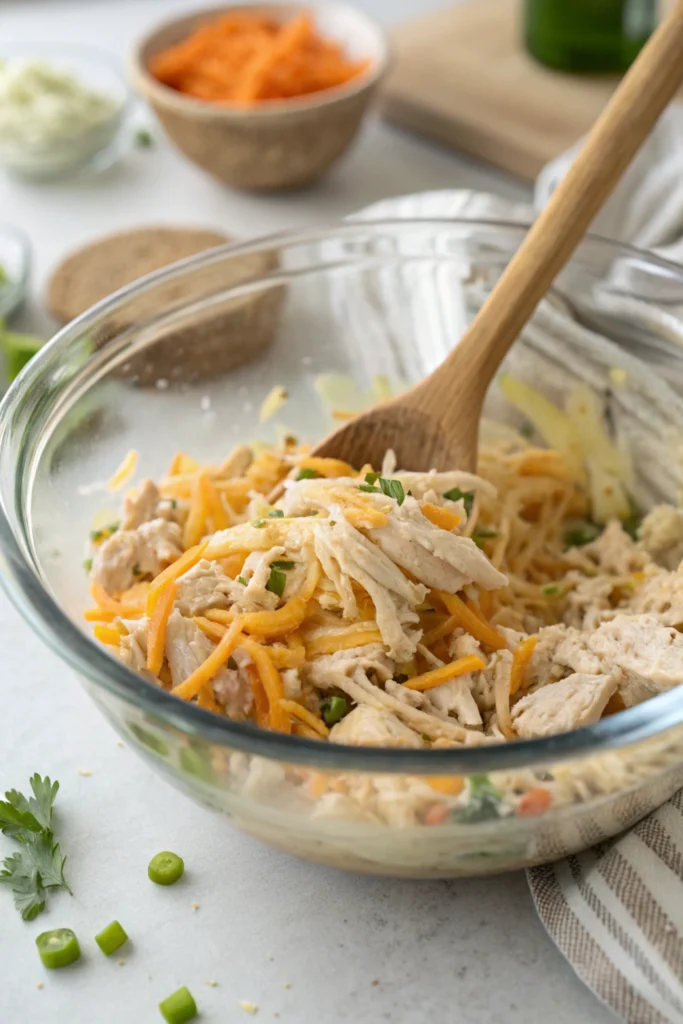
Step 2: Mix the Filling
Combine your shredded chicken with:
- 1 cup of shredded cheese (mozzarella or cheddar)
- 1/4 cup of sautéed vegetables (optional)
- 1 tsp each of garlic powder, salt, and pepper
- 2 tbsp of cream cheese or broth for moisture (avoid excess to prevent soggy dough)
Mix until evenly distributed. Taste and adjust seasoning—don’t be shy with the spices!
“A well-seasoned filling is the difference between good and great crescent rolls. Don’t skimp on flavor!”
Chef John, Culinary Institute, 2025
Assembling and Baking
This is where the magic happens—turning dough and filling into golden, crispy crescent rolls. Here’s the step-by-step:
Step 1: Stuff the Rolls
- Preheat your oven to 375°F and line a baking sheet with parchment paper.
- Unroll the crescent dough and separate into triangles.
- Place 1-2 tablespoons of filling on the wide end of each triangle. Don’t overstuff—leave room to seal.
- Roll from the wide end to the point, tucking the filling inside. Pinch the edges to seal tightly, preventing leaks.
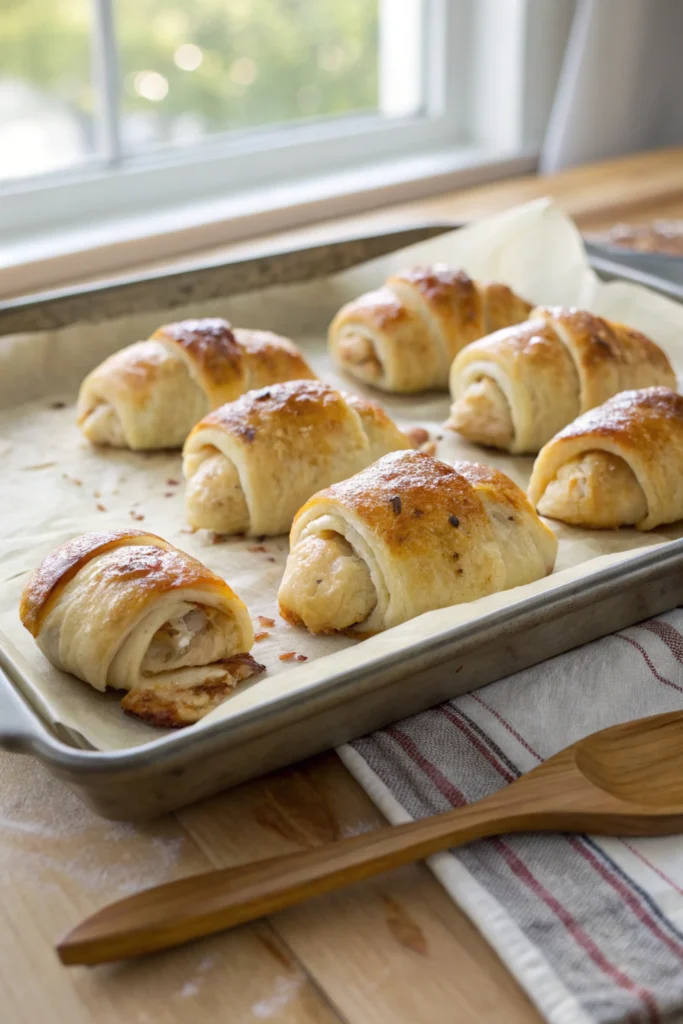
Step 2: Bake to Perfection
- Arrange the rolls on the baking sheet, leaving space between each.
- Brush the tops with melted butter for that crispy, golden crust. Sprinkle with a pinch of garlic powder or herbs for extra flair.
- Bake at 375°F for 12-15 minutes, or until golden brown. Rotate the tray halfway through for even browning.
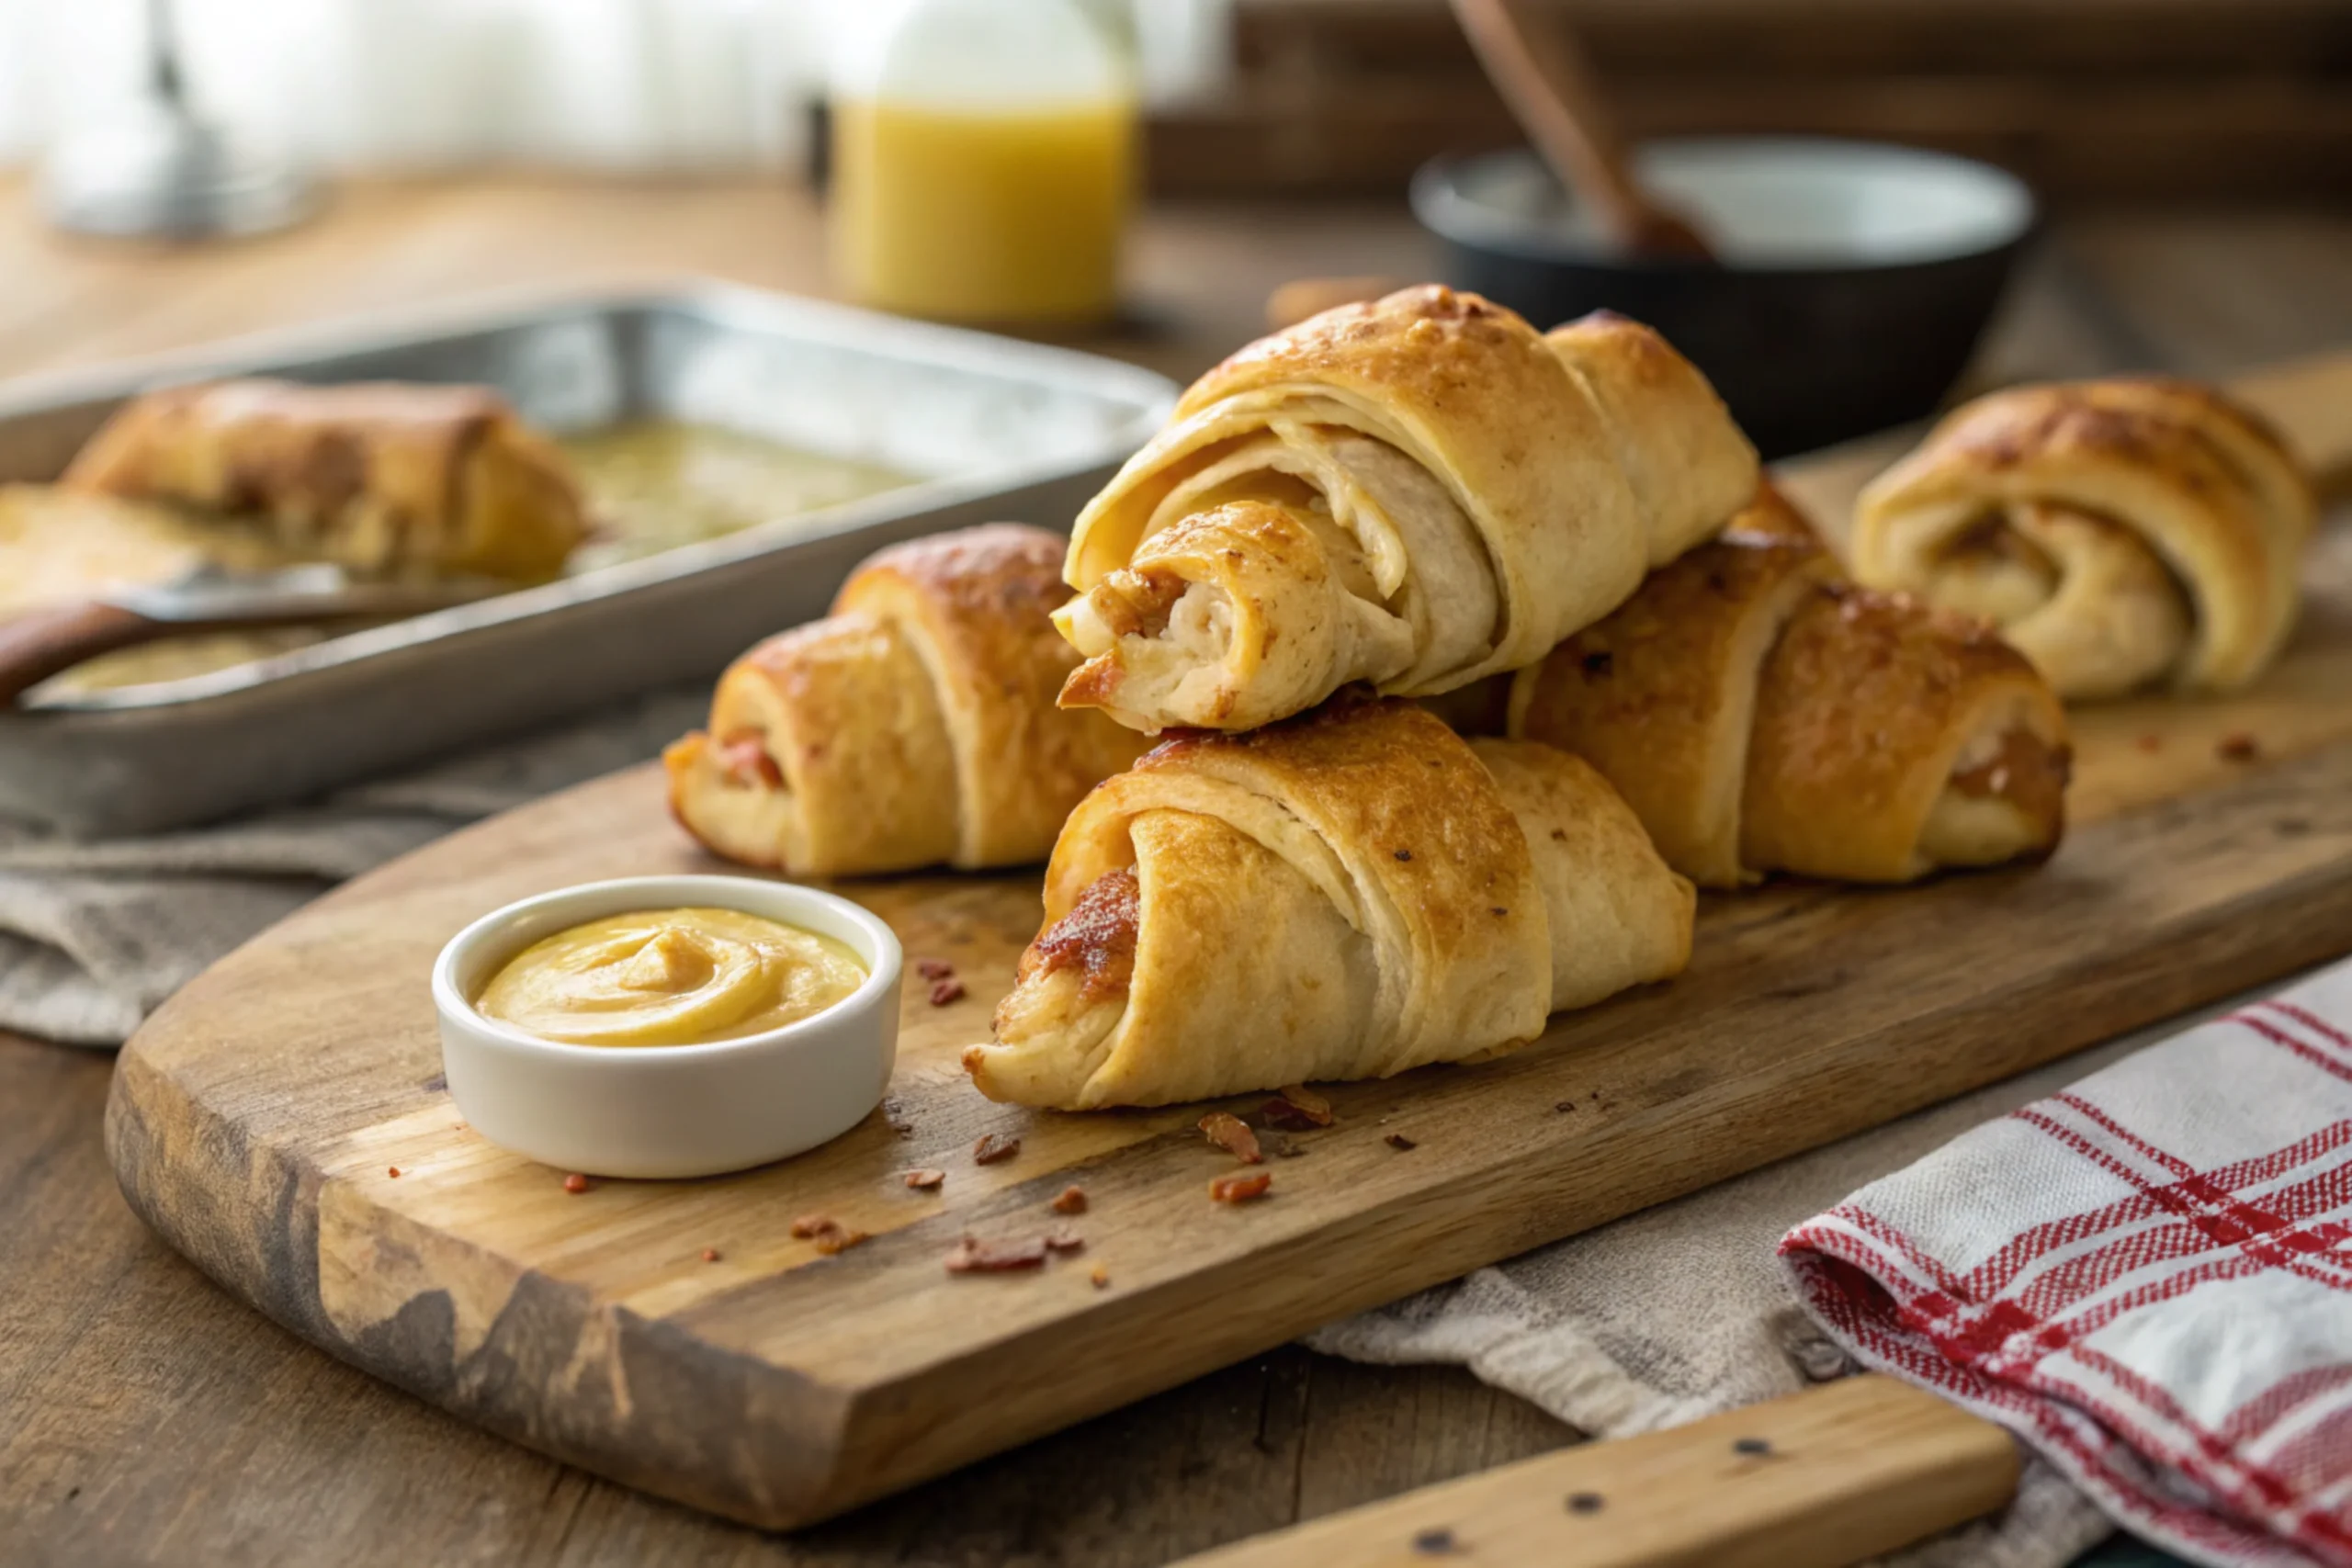
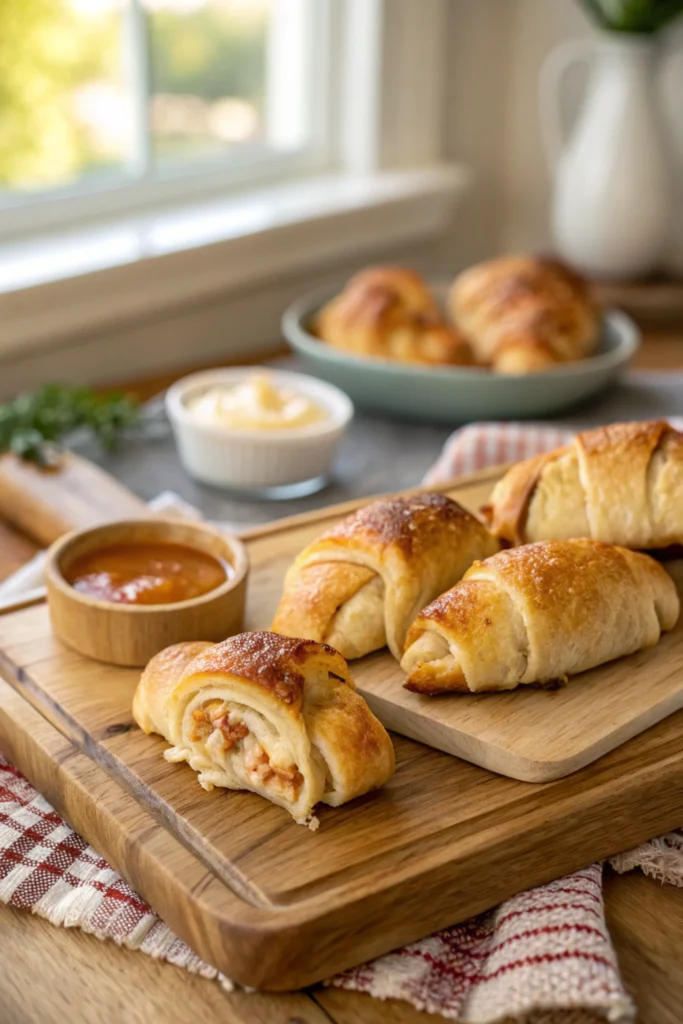
Serving and Beyond
Presentation: Make It Pop
Serve your chicken stuffed crescent rolls hot, straight from the oven, on a platter with dipping sauces like ranch, BBQ, or honey mustard. Garnish with chopped parsley for a pop of color, and pair with a fresh side like Southwest Chicken Salad for a complete meal.
Storage: Keep the Magic Alive
Got leftovers? Store them in an airtight container in the fridge for up to 3 days. Reheat at 350°F for 10-15 minutes to restore crispiness. Want to freeze? Assemble the rolls, freeze unbaked, and add 5-7 minutes to the baking time when ready to enjoy.
Variations: Get Creative
Why stop at classic? Try these twists:
- Taco Rolls: Mix chicken with taco seasoning, salsa, and cheddar.
- Italian Rolls: Use mozzarella, Italian herbs, and a touch of marinara.
- BBQ Rolls: Combine chicken with BBQ sauce and red onions.
Looking for more inspiration? Check out our Chicken Gnocchi Soup for a cozy pairing or Crab Cake Egg Rolls for another creative roll idea.
Common Mistakes to Avoid
- Overstuffing: Leads to leaks and uneven baking.
- Soggy Dough: Caused by wet filling—sauté veggies and drain excess liquid.
- Poor Sealing: Pinch those edges tight to keep the filling inside!
A Unique Angle: The Science of Crispy Dough
Ever wondered why some crescent rolls are soggy while others are gloriously crispy? It’s all about the science of baking. The key lies in moisture management and heat:
- Butter Brushing: Butter creates a barrier, reducing moisture absorption and promoting browning via the Maillard reaction—a chemical process that gives baked goods their golden color and rich flavor.
- High Heat: Baking at 375°F ensures the dough cooks quickly, trapping steam inside to puff up the layers while crisping the exterior.
- Parchment Paper: Prevents sticking and promotes even heat distribution, avoiding soggy bottoms.
“Understanding the Maillard reaction can elevate your baking game—heat and timing are everything.”
Dr. Emily Hart, Food Scientist, 2025
Conclusion
Mastering crispy and tender chicken stuffed crescent rolls is easier than you think, and with this guide, you’re well on your way to culinary stardom. From selecting the right dough to perfecting your baking technique, every step counts. So, roll up your sleeves, preheat that oven, and let the magic unfold. And hey, why stop here? Explore more delicious ideas on our site, like Chicken Gnocchi Soup or Crab Cake Egg Rolls.
FAQ Section
Can I Freeze Chicken Stuffed Crescent Rolls?
Yes! Assemble the rolls, place them on a baking sheet, and freeze until solid. Transfer to a freezer bag and store for up to 1 month. Bake from frozen, adding 5-7 minutes to the baking time.
What’s the Best Cheese for Melting?
Mozzarella is unbeatable for its gooey, stretchy melt, while cheddar adds a sharp flavor. For the best of both worlds, mix them in equal parts.
How Do I Prevent Soggy Dough?
Sauté vegetables to remove excess moisture, avoid over-wetting the filling, and bake at a high enough temperature (375°F) to ensure the dough crisps up quickly.
Can I Use Leftover Chicken?
Absolutely! Rotisserie or leftover baked chicken works perfectly, saving time and adding flavor. Just shred and mix with your chosen ingredients.

Chicken Stuffed Crescent Rolls
- Total Time: 25 min
- Yield: 8 stuffed crescent rolls
Description
Flaky, buttery crescent rolls stuffed with juicy, cheesy chicken—ready in under 30 minutes! Perfect for a quick dinner, party appetizer, or snack. These golden pockets of comfort are packed with flavor and super easy to make. Whether you use rotisserie chicken for convenience or season your own, this recipe is a guaranteed hit for all ages!
Ingredients
- 1 can (8 oz) refrigerated crescent roll dough
- 1 ½ cups shredded cooked chicken (rotisserie or baked)
- 1 cup shredded cheese (mozzarella or cheddar, or a mix)
- 2 tbsp cream cheese (softened)
- ¼ cup sautéed vegetables (optional, bell peppers, onions, or spinach)
- 1 tsp garlic powder
- ½ tsp salt
- ½ tsp black pepper
- ½ tsp paprika (optional, for extra flavor)
- 2 tbsp melted butter (for brushing)
- 1 tbsp chopped parsley (for garnish, optional)
Instructions
1️⃣Preheat Oven
Preheat your oven to 375°F (190°C). Line a baking sheet with parchment paper.
2️⃣ Prepare the Filling
In a bowl, mix shredded chicken, shredded cheese, cream cheese, sautéed vegetables (if using), garlic powder, salt, pepper, and paprika until well combined.
3️⃣ Assemble the Rolls
Unroll the crescent roll dough and separate it into triangles. Place 1-2 tablespoons of the filling on the wide end of each triangle.
4️⃣ Roll & Seal
Carefully roll the dough from the wide end to the pointed tip, enclosing the filling inside. Pinch the edges to seal.
5️⃣ Bake to Perfection
Place the rolls on the prepared baking sheet, leaving space between each. Brush the tops with melted butter for a crispy, golden crust.
Bake for 12-15 minutes or until golden brown.
6️⃣ Garnish & Serve
Remove from oven and let cool slightly. Garnish with chopped parsley and serve warm with ranch, BBQ sauce, or honey mustard for dipping.
- Prep Time: 10 min
- Cook Time: 15 min
- Category: lunch
- Cuisine: American, Comfort Food
Nutrition
- Serving Size: 4 servings
- Calories: ~180 kcal
- Fat: 9g
- Carbohydrates: 14g
- Protein: 9g